This article covers the basics about importing data into your Director account. Data imports can be used to create brand new entities such as customer records or to modify existing data such as phone numbers on existing client records.It will provide general instructions and some trouble shooting tips as well.
Each type of import is not covered in detail. Some imports do have their own supplemental articles for which you can find links at the end of this article.
This article presumes that you are able to get your data into the needed format and does not provide detailed instructions on using excel, etc.
To access the Data Imports area of Director is controlled by your user accounts rights. If you do not have access to this area of Director you will need to have the person that manages your Director account at your company grant your user account access.
We suggest checking out our Tips & Tricks for Successful Imports section near the end of this article before doing the import as it can save some headaches.
Please don't be intimidated by the length of this article, the process is rather simple and the article has LOTS of pictures.
Prefer to watch the video - use the WATCH THE VIDEO link at the end of this article.
Creating a data import
1) Go to the Tools module (upper-right portion of Director screen next to Logout).
2) Go to the Data Imports tab (on the left).
3) Click on the New button: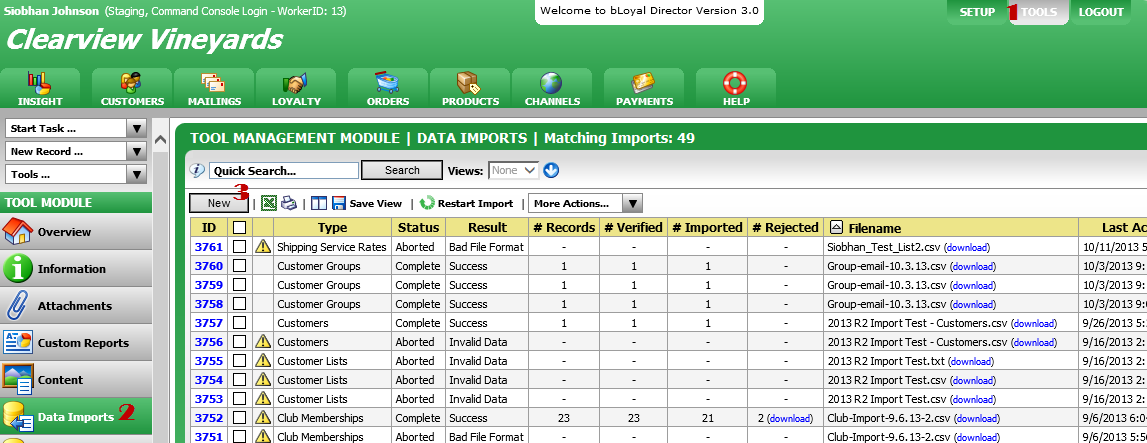
4) Select the appropriate application system. If importing customers and their related info, it doesn't matter which one is selected:
5) Select the Import Type you want to use:
6) The list of available imports is sorted alphabetically. Select the one you want and click it: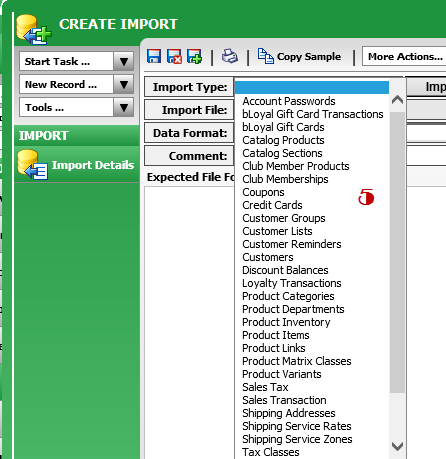
This will update the expected file format section with the list of columns/fields that given import type supports. It will list the Column Name and the Field Contents. You will need these Column Names as the first row on your import file. They need to be in the order listed, do not move them around. If you are only importing certain fields simply delete those columns from your import file, leaving the Columns in the same order.
Many imports support partial imports - or imports where you don't need to have all of the possible columns. This is will be reflected and let you know which fields are the minimum required.
Updating data using an import? Be sure to only include the fields you want to import (unless the import requires all fields be present) as any records that have no data for a given field/column will be "cleared." For example if you're only wanting to update phone numbers for customers on your import don't include other non-required fields and leave them blank such as first name, or the first name on that customer record will become blank. 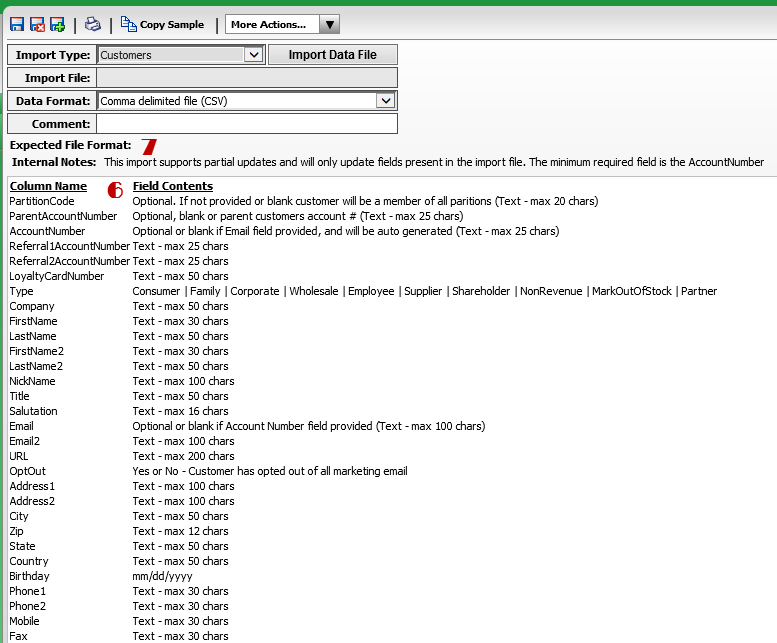
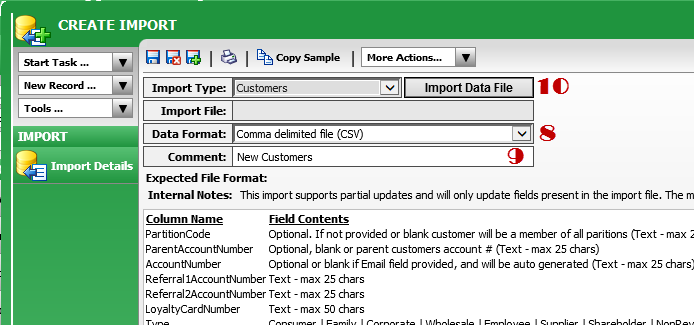
- Data Format: Select the type of file that you will import. Depending on the import type some of the following options may not be available. You can use a tab delimited or comma delimited file and sometimes an xml file. You cannot complete an import with a PDF file.
- All imports require a comment be entered. We suggest something that can help identify the purpose of the import.
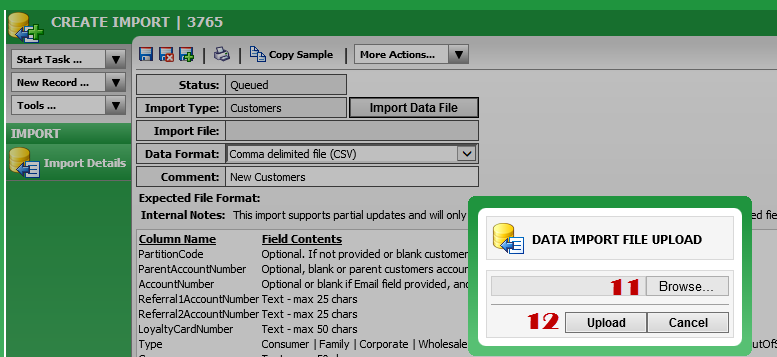
- Click on the Import Data File button to select your file.
- Click on the Browse button to find the file on your computer.
- Once the name of the file appears to the left of the browse button click the Upload button.
- The file name for the import will now display in the Import File field. Click on the Save and Close Icon if you're ready to start the import.

- The Data Import list view will refresh and show the status of the import as Queued. If the import is fairly small it will complete within a couple minutes. If the import is large it may take longer. You can click the Search button on the list view page to refresh the page and see the status. It is a good idea to check on your import to be sure it is successfully processed.
- The Status will update to Complete once the import has been completed. Please note that this does not mean that there are not any records that may have been rejected, If only a few records were rejected the import will likely still have a status of Success. See the next section Decoding Aborted & Rejected Records for help with troubleshooting imports.

Decoding Aborted Imports & Rejected Records (this includes a few examples and is not intended to be an exhaustive list of all of the potential issues that may arise with an import).
- The Status of the import says Queued and the Filename field is blank. >> You forgot to attach the file you're trying to import. Click on the ID of the import and complete steps 10-13 above.

- The Status of the import is Aborted and the Result says Bad File Format. >> You are either missing columns that are required or they are improperly names. Click on the yellow triangle for more details. This will give you details as to what the formatting issue is. In this example the file is missing required columns. Correct the data on the import file and try a new import.

- The Status of the import is Aborted and the Result says Invalid Data. >> You either have the wrong data type - such as a text where you should have a date or as in the example below the data you have entered is too long for the field. Click on the yellow triangle for more details. In this example the customer with the account number listed has data beyond the 50 characters allowed in the Title field. Correct the data on the import file and try a new import.

- The Status of the import is Complete and the Result is Success but the number imported does not match the number of verified. >> You have some records that were not able to be imported. The number of records that couldn't be imported will show in the # Rejected column. Click on the yellow triangle for more details. In this example some records had incorrect data.

Tips & Tricks for Successful Imports
- When importing customers, to resolve existing customers for updates, first we use our Customer Id (CustomerID or CustomerUid), then the ExternaliD, then the AccountNumber, then the resolution rules specified in the Company Profile (found in Setup => Settings in Director).
- Some data fields often contain leading zeros such as zip codes or customer account numbers. You'll need to be sure to handle your data properly before you save and import to be sure that those leading zeros are preserved.
- Files formatted as CSV drop the .00 needed for currency fields. You will want to use the format of tab delimited for imports that contain the currency fields.
- Page breaks in your data fields can cause data to be imported incorrectly. These are often hard to see, but you can search for them using the "shortcut code" of alt 010
- We recommend, whenever possible, not to have commas in your data, as they can cause import issues and incorrect parsing of data. If you aren't able to remove all commas you will want to use a file format of tab delimited instead.
- Each row of data is considered a record. Your import file will have a header row of data and that is not "counted" as a record. When troubleshooting imports, if there is an issue with record 9, that actually corresponds to row 10 on your file as the first record is on row 2, the second record is on row 3, etc.
- Since data can be updated with imports, if you have an import that is for shipping addresses for example and you have 5 records, but 2 have the same Title you will end up with only 4 new shipping addresses for the customer as the Title field is the unique identifier for shipping addresses. The import will say it imported 5 records as it did; it first created 4 records, then updated 1 that it just created because the Title was the same.
- Use the Copy Sample icon to copy all of the Column Names to ensure that you have the proper spelling, etc. You can then paste the results into excel as needed.

Helpful articles on specific data imports
Some articles may contain other information in them as well so you may need to look through the article a bit for information on imports. Searching on the word "Import" is a good way to find what you're looking for.
Comments
0 comments
Article is closed for comments.