The article covers the basics of creating a Shipping Service Rate import. This article presumes that you have aquired the rates from your elected shipping providers or otherwise have a spreadsheet of weights and rates that you want to charge your customers.
*Please note that this article contains example data and your data will not necessarily match the data shown here.
Prior to beginning, we suggest familarizing yourself with the overall setup: Shipping Carriers, Zones, and Services
Step 1: Things you will need prior to completing this import:
- Shipping Carriers set up in your Director account
- Shipping Zones set up in your Director account
- Shipping Services set up in your Director account
- Rate information so you know what you'll be charging - be sure to know how you zones are set up, by state, by zip code, etc.
- Any handling fee you will add on to your shipping rates
Now that you have the above pieces complete you're ready to begin creation of your shipping service rate import. You will be saving your work as a csv or tab delimited file - typically you will create your file in a program such as excel and then save the file in one of those formats.
Step 2: Creating the import file:
- Go to the Setup Module >> Settings Tab >> the scroll to find the Shipping Services link. Click on that. Make a note of the Carrier Name and the Service Code for the service(s) you are going to import the rates for.

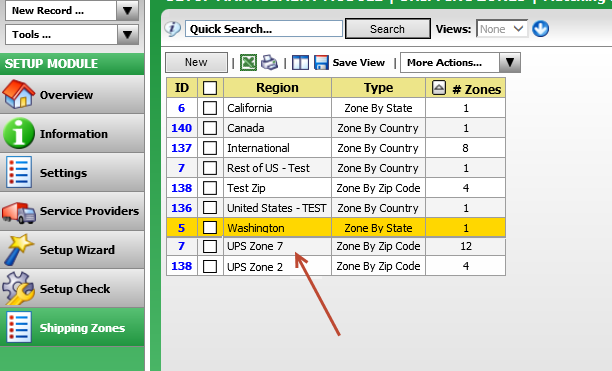
- Click on the Settings Tab and scroll to find the Shipping Zones link. Click on that. Make a note of the Region Names for the regions you are going to import the rates for.

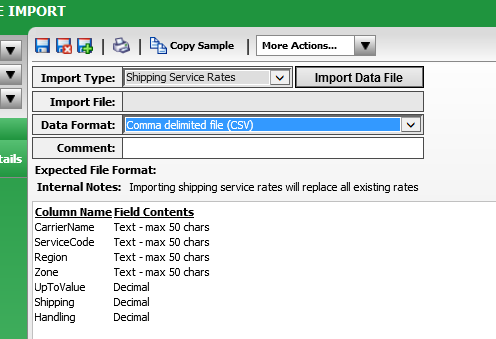
- Go to the Tools Module >> Data Imports Tab >> Click on New >> select Shipping Services Rates from the drop down. Copy the Column Names to your excel spreadsheet. They MUST MATCH EXACTLY or the import will fail. Be sure to do this step versus use the image contained in this article to determine the Column Names as they could change.

- Enter the column names into your excel spreadsheet. You will now need to complete the rate "table" for the service(s) that you want to import rates for. You will need to complete the fields listed below - you will leave the zone field blank. >> In this example the UpToValue is a weight, this can also be quantity (of items) based. This depends on how you set up your services to be weight or quantity based. **Please note that the weights listed here are listed as 1.01, this is because you want the rate of $20.15, plus $5 handling to apply to orders where the weight is up to 1.01, so in order to include the weight of 1 you need to list it as such. The same applies for quantities.
>> You will see that in we have a Handling charge of $5, if you do not want to charge handling then you can enter 0. Some people combine the charge for shipping and handling into one amount and simply enter that in the Shipping field, that is up to you and your business practices/requirements.
>> You will see that you need a row/record for each service/region/UpToValue combination you want to import rates for.
>>>>> In this example we have rates for 5 combinations of UPS Ground for Zone 2 - it covers weights up to 5.01.
>>>>> In this example we have rates for 5 combinations of UPS Next Day for Zone 2 - it covers weights up to 5.01.
>>>>> In this example we have rates for 5 combinations of UPS Next Day for Zone 7 - it covers weights up to 5.01.
- Once you have all of your rates entered into the spreadsheet you will want to save it as a csv or tab delimited file. Be sure that the file is closed. Go back to Director and the Shipping Service Rate import in Step 3.
IMPORTANT NOTE: All rates for a given service/region combination will be removed and replaced with those in your import. Using the sample import above>> If you have a rate that goes has an UpToValue of 6.01 in Director, but the import only has rates with an UpToValue of 5.01 - you will no longer have the rate for 6.01.
- Chose the file format you saved your spreadsheet in and enter a comment - typically something indicative of what you're importing.
- Click on the Import Data File button and then the Browse button on the popup screen. Find the file you saved and click open or double click on the file to select it - then click the upload button.
- Click the Save & Close icon and the import will begin.
- You will be returned to the Data Imports list view where you can check on the status of your import by clicking Search button.
Need additional help with import basics? Check out this article.
Comments
0 comments
Article is closed for comments.