You can create a Customer List and add members to it in several ways.
Option 1: Start by creating a list and then select the List Members.
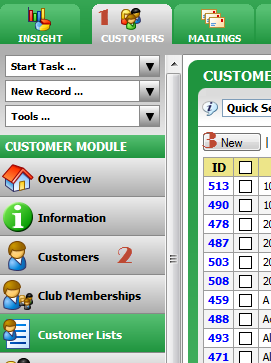
- Go to the Customers Module
- Click on the Customer list tab
- Click on the New button in the Tool Bar
- Input the appropriate information:
a. Title: The name for your list
b. Start with: This allows you to start your list with Members of your other existing Lists, Subscriber Groups, Membership Programs or Clubs
c. Description: Helps to identify the list and its intended use when you come back to it in the future.
d. List Codes: If you have these you should select them as appropriate.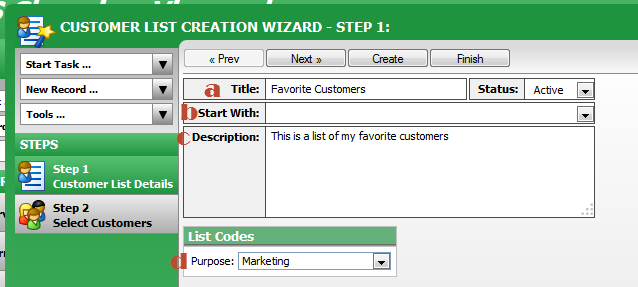
- Click the Next button and then search for and select the customers you would like to include by checking the box on the side of each Customer and click the Save icon.
- Repeat as necessary to add additional customers to the list.
- Click the Save and Close icon when complete.
Option 2: Start by selecting the customers that will be part of the list and then create and add them to the list
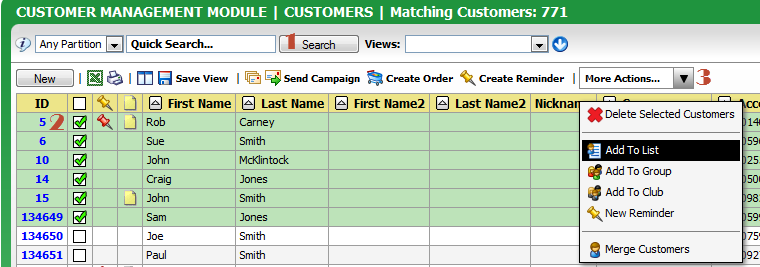
- Enter any search criteria and click the Search button. You can do this from various areas in the application such as: Customers tab, orders tab, etc.
- Click the check box to the right of the id for the customer(s) you wish to add to a list.
- In the More Actions drop down box, select Add to List.
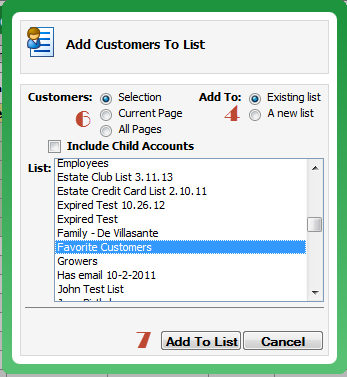
- On the pop-up message that appears, click the radio button marked A new list or Existing list if you have already created the list and want to add more customers to it. If you select Existing List you will need to click on the name from the list.
- Add a Title and Description for your list if you selected A new list.
- Decide if you want just those that you checked the box for, or if you entered search criteria you may want to check the All Pages option.
- Click the Add To List button. This will add the selected customers to the list. If they happen to already be on the list (if you selected Existing list), it will not add them again, it simply includes them once.
Option 3: Create a customer list and import customers to it.
- Follow steps 1-4 in Option 1, leaving the Start With field blank.
- Copy or write down the list name, you will need this exactly as it appears here.
- Click the Finish button.
- Import your file. Need help with the import? Check out this article.
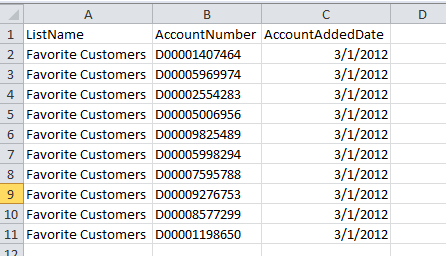
Import File Format Note: You do not need to have both the account number and email address on your import file. You can have one or the other. If you only have one do not include the other column in your file. If you only have one it is recommended to use the Account Number when possible. If you are a client that uses partitions you will need to use the account number as email address is likely not a unique identifier for your customers. See below for an example.
Option 4: Add customers from an existing Subscriber Group or Customer List.
Comments
0 comments
Article is closed for comments.